Visual Studio Code (VS Code) is one of the most popular code editors for Salesforce developers, which helps developers write code in an efficient manner. In this blog, we will guide you on how to set up VS Code for Salesforce Development which includes installing the necessary extensions, connecting it to your Salesforce org, etc.
Table of Contents
ToggleStep 1 :Installing the VS Code
For installing VS code , First you need to download it from here or you can go to search on google VS code download and then install it.
Step 2: Installing the Salesforce CLI for VS Code Set up
You can download Salesforce CLI as per your system configuration from here.
Step 3:Installing the Salesforce Extension Pack
Open the VS code and install the Salesforce Extension Pack by searching from the extensions view.
It includes:
- Apex-Provides code-editing features for the Apex programming language
- Apex Interactive Debugger- Provides debugging support for the Apex programming language
- Apex Replay Debugger- Replay Apex execution from Apex Debug Log
- Salesforce CLI Integration- Provides integration with the Salesforce CLI
- Aura Components- Provides code-editing features for Aura Components
- Visualforce- Provides syntax highlighting for the Visualforce framework
- Lightning Web Components- Provides code-editing features for Lightning Web Components
- SOQL- Provides code-editing features for SOQL
- SLDS Validator- Salesforce Lightning Design System
Note – Now your VS Code Set up is completed, all you need to create a new SFDX project.
Step 4:Creating a New SFDX Project in VS Code
Create a new SFDX project by pressing Ctrl + Shift + P and selecting Create Project with Manifest.
After that Provide a name for your project and select a folder where you’d like it saved.
Step 5: Connecting to a Salesforce Org
To connect to a Salesforce org, press Ctrl + Shift + P, then select Authorize an Org.
Choose the environment as per your needs.
Step 6:Retrieve data from the Org
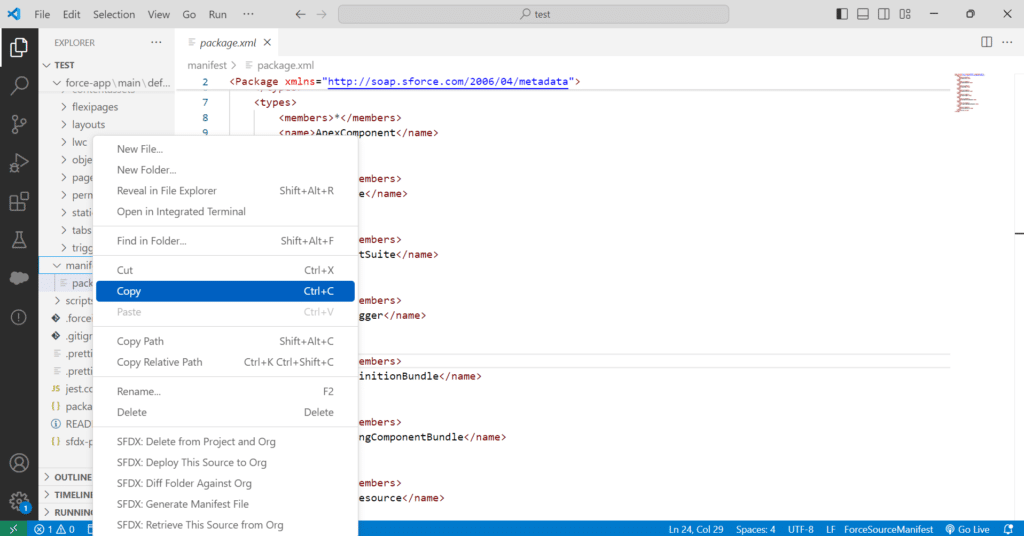
Go to manifest -> package.XML and retrieve from the source by right clicking and select “SFDX: Retrieve This Source from Org“

After retrieving, you can begin writing code and deploy it to the org by right clicking and select “SFDC: Deploy This Source to Org“.
By simply following these steps, you can easily set up VS Code for Salesforce development. This setup enables you to connect to your org, manage projects, and deploy code efficiently, making it easier to work on your Salesforce projects.
You may also checkout other blog and courses on our website.


